Wednesday, 5 June 2013

Honda T360

As a break from Land Rovers I've returned back to my Showa models and started on the Arii 1/32 Honda T360 little truck.  This a lovely little model which can benefit from some extra detailing.
I will be opening the door windows and detailing the cab, and will also replace the rear canvas cover over the body.  The Arii roof is rather featureless and lacking in detail.  To remedy this I have made a frame from brass wire and will add the canopy (once the rest is painted) from good quality tissue, cut to shape and soaked in a water/PVA glue mix.  As it dries the tissue will shrink to emphasise the frame, will be hard and have a good texture.  I can then add the tie downs from waxed thread, replacing the lashing hooks with bent wire.

This is the model with the plastic tilt in place...


As you can see, it looks just like a big lump sitting there... and this closer image of the part doesn't make it look any better.


So here is the model with my brass wire hoops added.  I still need to add the bracing parts of the frame, which I am assuming are running lengthwise just below the bend in each hoop... I haven't been able to find a photo of the tilt removed exposing the hoops.


The interior is nicely handled, but I will be adding more detail...


Just to show you how small this little vehicle was, I have a couple of comparison shots - one with a Land Rover, and one with a man on a Honda Super Cub...


The size of these Kei vehicles never ceases to amaze me.

I've also decided to finish this as a hard working little truck which has been roughly treated, so I will be adding the odd dent, some rust and fading paint.  It won't be as bad as my VW Beetle, but won't be in showroom condition either.  Kind of half-way between these sad examples found on http://honda-tech.com/showthread.php?t=2114172


Mata atode 
(see you soon)


Monday, 27 May 2013

A little improvement

While I was working on a Land Rover kit the other night I noticed that on the clear parts sprue there were strange little ball-shaped tags from the moulding process, and they looked useful somehow... then I looked at my Showa Diorama... and at the street light...

Originally the bulb was just the kit part painted white...

The new bulb is clear and instantly looks much more realistic.

I also decided to try and play about with a photo of the diorama and came up with this... it's not that great, but it killed ten minutes or so...


Friday, 3 May 2013

Airfix Modern Cars

In the 1960s and 70s Airfix of Britain produced a wide range of 1/32 cars of the type you could see on any street in the UK or Europe.  All featured a full chassis, interior detail, glazing and plastic tyres rather than rubber, as seen in all of the Arii kits.  Unlike the Arii kits, however, some Airfix kits were sold in an alternative packaging with parts to allow the car to run on a track, similar to Scalextric.  Indeed there are collectors out there who are happy to buy up classic kits and turn them into toys rather than detailed static models.
Some people are barbarians, haha...

Where was I?  Oh yes... this range of modern cars was supplemented by sports cars of the day, such as the Ford GT40 and the like, and the range ran in tandem with Airfix's classic cars, which were all pre-war.  They did produce one model that straddled the eras, Monty's Humber... this was a large open top saloon used by General (later Field Marshall) Montgommery during WW2.  I plan to get the reissued version, but that's another story.

The cars eventually left the range in the '80s, with only the classic cars making an appearance... however, in the late '90s they started to make a comeback.  The first reissues were the Aston Martin DB5, Jaguar E-Type, MGB and Triumph TR4.  These sporty cars were obvious choices as they are rightly seen as classics. Later the VW Beetle joined them.  Apart from the Beetle these kits are still available from Airfix.
In the early part of the century Airfix then released a classic cars set, containing the Ford Escort Mk1, Triumph Herald and the MGB.  The Escort and Herald are also on sale as I write.  There was another, limited set which again contained three cars, but this time one of the cars was the Vauxhall Viva HA, a rather boring square car, but highly common and popular during the '60s and '70s.  The Viva is currently not available.

When Airfix stopped producing these kits some of the moulds were sold on to a company called MRRC.  To my knowledge only the Mini was sold as a proper kit, the others being sold as motorised racing cars.  However, three of the saloons DID make a reappearance in the '80s: Cortina Mk1, Zodiac Mk3 and Capri Mk1... as street rods, the tooling reworked to add bulges and slots in the bodywork, forever ruling out their reissue as normal car kits.

While Arii has a huge range of reissued LS and Otaki kits under its banner, Airfix has only a relative few car kits in 1/32 on release, however some of these are new models, such as the Mini Cooper S, based on the BMW version rather than the classic Mini, as well as some World Rally Cars.  Like the original Airfix car kits they have plastic wheels rather than rubber tyres, a mistake as far as I'm concerned.

Finally, here is a listing of the Airfix Modern Cars produced in the '60s and '70s.  I haven't included the racing cars, or the Dune Buggy.

Aston Martin DB5  +
Austin Healey Sprite Mk1  +
Austin Maxi
Bond Bug 700E
Ford Capri Mk1
Ford Cortina Mk1  *
Ford Escort Mk1  +*
Ford Zodiac Mk3  *
Jaguar 420
Jaguar E-Type  +
Maserati Indy
Mercedes 280SL
MG1100 Saloon
MGB  +
Morris Marina
Morris Mini Minor/Austin Seven  *
Renault Dauphine
Sunbeam Rapier
Triumph Herald  +*
Triumph TR4A  +
Vauxhall Victor 2000 Eastate
Vauxhall Viva HA  *
Volkswagen 1200 Beetle  *

Those marked with * are ones I have.  Kits with + are currently available.

Back to modelling next time ^_^

Saturday, 27 April 2013

Airfix Cortina photos

Much to my joy the Airifx Cortina had been sent by Next Day delivery, so it was waiting for me when I got home from work.  To see such a classic model still with the original 1960s header card/instructions was a real joy... and the mouldings are in wonderful condition.  Well, the windscreen is a bit pitted but I have Humbrol Clear, which is self-levelling... which means it can repair blemished clear model parts.  Happy days.

Here are some photos of the model... it had been started by the owner, but luckily they knew what they were doing... unlike the owner of the first Zodiac I bought.


When I eventually build this model I will finish it as a Cortina GT, allowing me to use a different colour scheme... not too fond of white cars, and all Lotus Cortinas were white with that green flash down the side.

Thursday, 25 April 2013

Airfix Mk1 Cortina at last!


Today is a milestone in my 1/32 car collection... I have obtained one of my Holy Grail models - the Airfix Mk1 Cortina.  There are Cortinas available from Scalextric and Revell but these are slot-racing cars and not detailed static models.  The kit was available until the early 70s then vanished - only to reappear retooled as some kind of street dragster, thus wrecking the chances of the original kit ever reappearing.
That just leaves the Sunbeam Rapier, Bond Bug and Vauxhall Victor Estate on my most-wanted list.

My dad had one of these Cortinas when I was very young, white with custom racing seatbelts, although I seem to recall it was a 4-door saloon rather than the sporty Lotus marque.  It was replaced by a big blue Ford Corsair.  Lovely car.

Anyway, this is the kit as I saw it on eBay:


I had always wanted to build this as a Glam Cab from the British comedy film "Carry on Cabby", but as you can see from the photo below the cars had 4 doors, where the kit has 2.


What I may do instead is convert one of my Scalextric/Revell versions and spare the Airfix kit, building it as a nice clean saloon in private hands.

I'm happy to have this rare kit, and happier to know that it will never be reduced to a slot-racing toy.  It will be some time before Liquid Poly meets 1960s plastic, but at least I have the model, so I'm happy with that.

Saturday, 20 April 2013

A Hard-working Land Rover

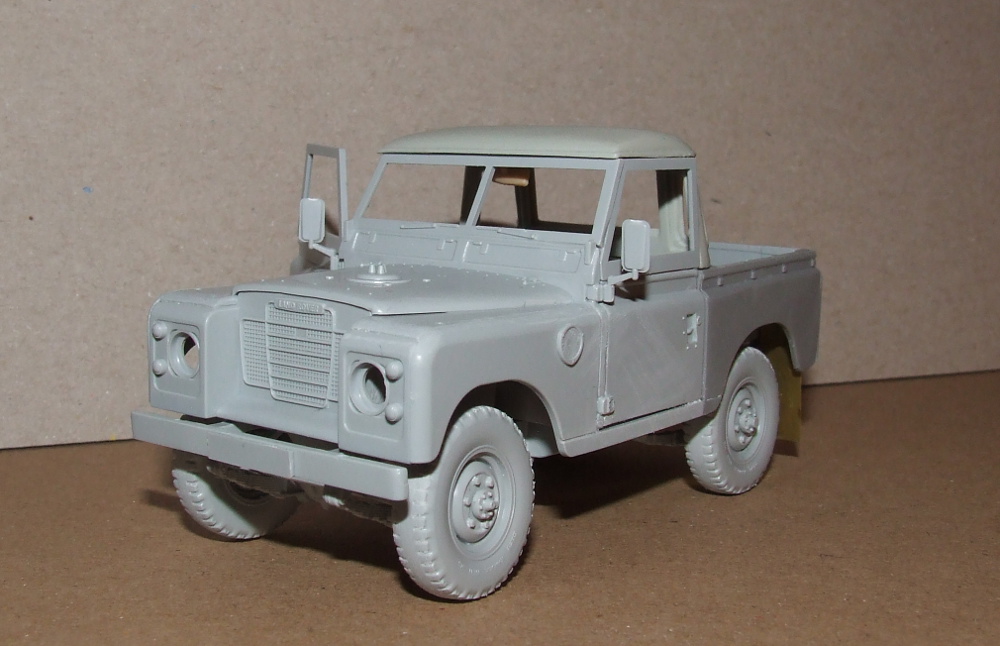
Away from family or popular cars and here is a civilian Land Rover Series 3 I'm working on.  It's a hybrid of the reissued/slightly retooled Italeri Land Rover and an Azimut cab/88" conversion set.  With the conversion set (which is intended for the Tamiya Series 2 'Pink Panther' kit) contains cab, shortened rear wings, civilian rear cross-member, doors and windscreen, and also includes a section of rear chassis and smaller items for the interior and rear cross-member.
Since I used the Italeri kit I decided to only use the cab, rear wings and cut-down rear chassis.  So, the Italeri kit:


Becomes this:


It certainly makes for a very interesting variation on a theme.  I have since given the vehicle a base coat of Tamiya Olive Drab...


I had thought of a blue finish, but there is a rather sad green 109" Land Rover down the road from where I live that I thought I would base the weathering and finish on that vehicle.  This will take some time to complete and will have a small scenic base to set it off (hopefully with one or two figures to give it context).
The rear will have clutter and dust, as will the cab, and there will be an orange lamp added to the roof.  If it turns out as I hope, I will create a similar look on an Arii Honda T360.


Sunday, 7 April 2013

A Dead VW Beetle (and a new figure)

First up, I have been working on a 1/35 military diorama and I decided to add a civilian car to the scene, which is set in Bosnia in the 1990s.  With most of my 1/32 cars being Japanese it didn't leave me many options for what to use.  I could use the Bilek UAZ van... but no way am I killing something that expensive.  My Airfix cars are all either British or right hand drive (as well as a couple being extremely rare) so they were out... so that left the Arii VW Beetle, 1950 version.
As these are very cheap and easy to buy I decided to sacrifice one.

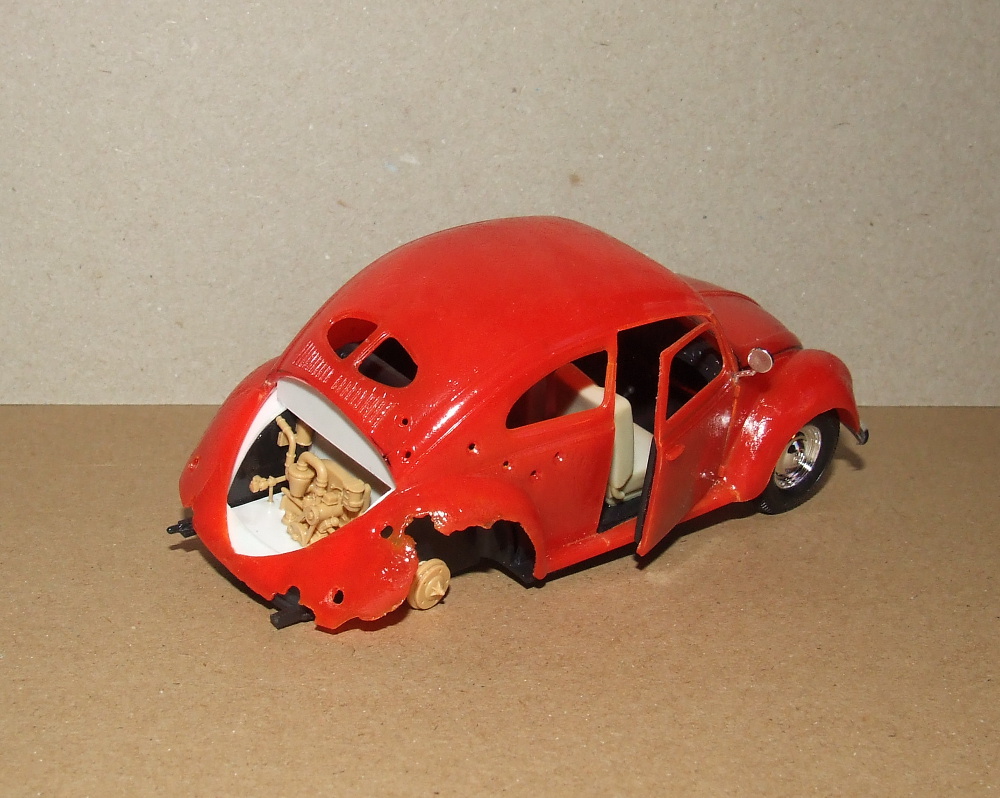
Using a motor tool I ground out some damage on the rear wings, bounced a ball-cutter all over the body, removed the engine cover (added a Tamiya VW Kubelwagen engine) and carried out other modifications... one of which was opening the passenger door.
Here is the car before the detailing being complete.


I then sprayed the vehicle in Tamiya Red Brown to use as the base for the rust which I would expose using what's known as the 'hairspray technique'.


I then applied (with a sponge) various rusty shades, paying particular attention to the rear of the car.


I then sprayed the body shell with a few coats of Treseme hair spray.  This is a water-based spray and acts as a barrier between the undercoat of rust and the blue colour to be sprayed over the top.  
Once the spray was dry I gave it an hour and then sprayed the main colour over this... Tamiya Light Blue.  I then left this for an hour to dry - the joys of acrylics.
When I felt the time was right I got some old brushes and a jar of water and sloshed the water over the various panels of the shell, allowing it to seep through the blue.  Gently at first I began scrubbing at the driver's door... and was rewarded after a minute or so to see the paint come away and expose the rust underneath.  I was so happy that something I was trying for the first time actually worked!
I carried on and tried to create a believable amount of paint loss for a car which had been lying exposed to the elements for several years in a ditch.
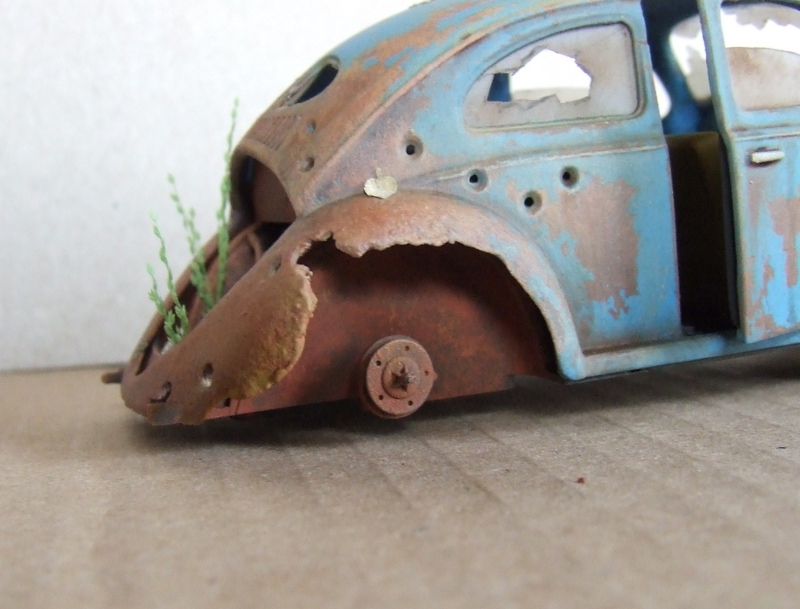
This is how the car looked once the rust had been exposed...


After several coats of a Humbrol acrylic matt varnish I allowed the car to rest for a day.  The varnish protects the blue from any further weathering and also protects the rust colour from any damage.  
I then used a mixture of washes with thinned Raw Umber oils, drybrushing with Humbrol Light Sand, and liberal use of MiG weathering powders to further distress the car.
I also painted some of the silver parts as photos of dying Beetles show that parts such as the bumper, chrome stripes and light bezels seem to survive quite well.  Using acetate I added windows, some of them broken and finally added the headlight.  Since the car is lying in undergrowth I also added some grass and longer plants coming out of the engine bay.  Once everything was in place and all weathering complete I gave the model a few more coats of matt varnish to protect it from handling.


I won't cover the rest of the diorama as it doesn't fit in with the remit of the blog.

Finally, I recently discovered a 1/32 female driver figure.  She was intended for a Scalextric-type slot car layout, but she fits perfectly many of the Arii, Aoshima and Airfix cars in this scale.  She is made by a company called Le Mans and is cast in resin, making her very light.  She also comes ready painted... and while it's not bad for a factory finish I think I need to tidy it up in places.
Strangely, while she has fair hair her face has an Asian appearance, so I may repaint the hair black to allow her to work with a particular Arii car... or even the Airfix Mini?


As you can see she's posed as if changing gear in a left hand drive car... which may be a problem.  I'll have to see if I can remove the right arm, and if I can I will repose it so that he hand is resting on top of the wheel rather than changing gear.

Mata atode ^_^